1. 启动在线靶场
登陆 在线靶场,启动S2-007环境,等待环境启动之后,点击访问靶场按钮即可前往靶场环境。该环境来源于vulhub和vulapps

2. 查看检测结果
登陆洞态IAST官方网站,查看漏洞检测结果


3. 进入搜索功能,分析完整的污点调用图
3.1 Source点
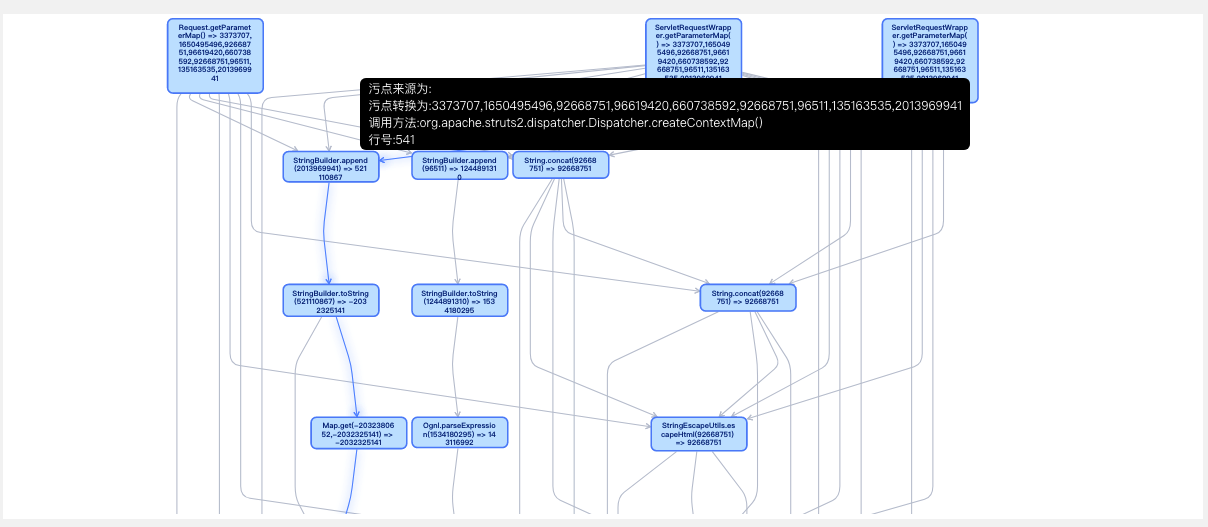
首先,在org.apache.struts2.dispatcher.Dispatcher.DefaultActionMapper#createContextMap()方法中,调用Servlet接口的getParameterMap方法获取外部参数,形成初始污点,然后将Map对象放入struts2的上下文com.opensymphony.xwork2.ActionContext.parameters中
3.2 Propagator方法
经过一系列的处理,在com.opensymphony.xwork2.interceptor.ParametersInterceptor#doIntercept方法中,调用this.retrieveParameters(ac)方法获取参数,最终通过this.get("com.opensymphony.xwork2.ActionContext.parameters”)方法通过struts2上下文获取参数,与初始污点关联起来;
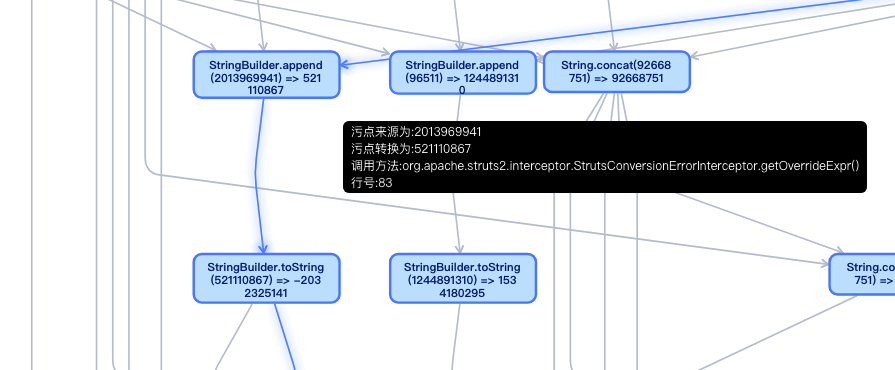
初始污点在com.opensymphony.xwork2.interceptor.ParametersInterceptor#doIntercept方法中通过setParameters方法将参数传递至ParametersInterceptor实例化对象中,最终在com.opensymphony.xwork2.interceptor.ConversionErrorInterceptor#intercept中调用org.apache.struts2.interceptor.StrutsConversionErrorInterceptor#getOverrideExpr方法,经过字符串拼接,形成最终的ognl表达式,代码如下:
protected Object getOverrideExpr(ActionInvocation invocation, Object value) {
    ValueStack stack = invocation.getStack();

		String var4;
    try {
        stack.push(value);
        var4 = "'" + stack.findValue("top", String.class) + "'";
    } finally {
        stack.pop();
    }

    return var4;
}
代码中字符串拼接对应JDK层StringBuilder的一系列操作,如下图
ognl表达式在com.opensymphony.xwork2.interceptor.ConversionErrorInterceptor#intercept方法中,被放入map对象faike中:fakie.put(propertyName, this.getOverrideExpr(invocation, value));
然后,设置fakie对象到ExprOverrides中
if (fakie != null) {
	stack.getContext().put("original.property.override", fakie);
	invocation.addPreResultListener(new PreResultListener() {
		public void beforeResult(ActionInvocation invocation, String resultCode) {
			Map<Object, Object> fakie = (Map)invocation.getInvocationContext().get("original.property.override");
			if (fakie != null) {
				invocation.getStack().setExprOverrides(fakie);
			}
		}
  });
}
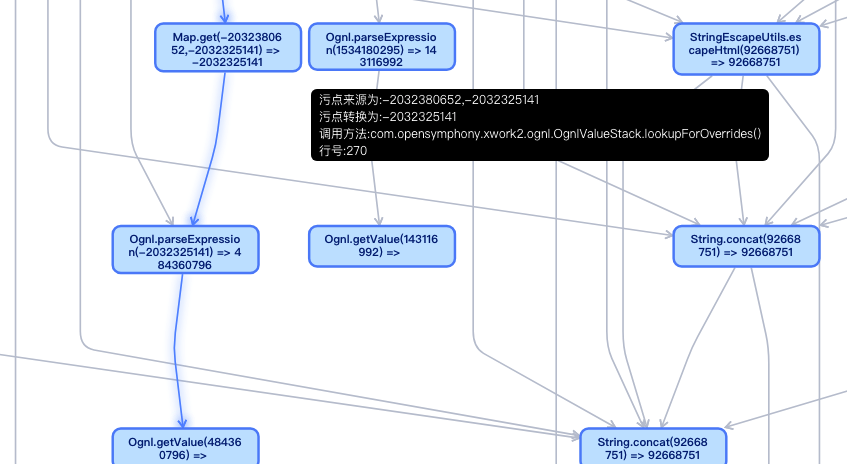
然后,在com.opensymphony.xwork2.ognl.OgnlValueStack#lookupForOverrides方法中,将Ognl表达式读取出来
然后在com.opensymphony.xwork2.ognl.OgnlUtil#getValue方法中,调用compile方法,形成Ognl对象
public Object getValue(String name, Map<String, Object> context, Object root, Class resultType) throws OgnlException {
    return Ognl.getValue(this.compile(name), context, root, resultType);
}

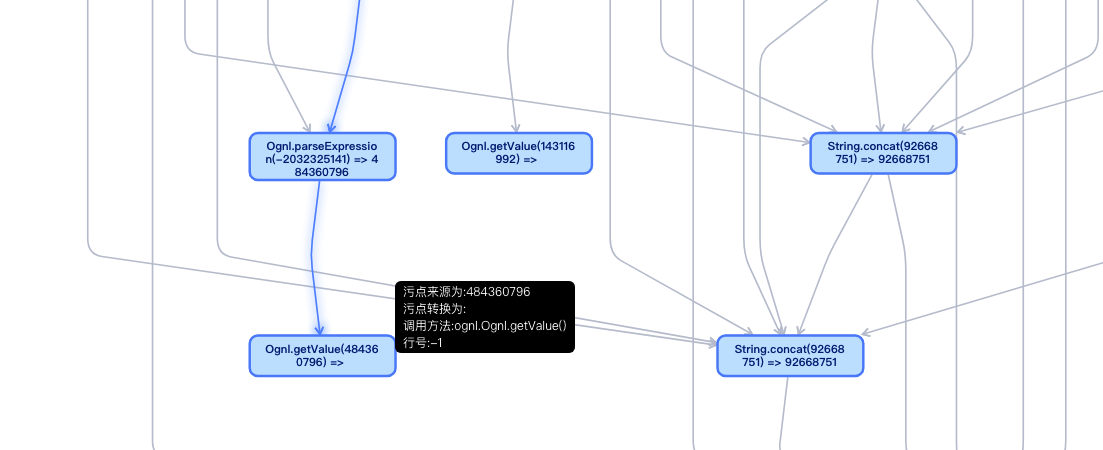
3.3 Sink方法
最后,在ognl.Ognl#getValue方法中,使用Ognl表达式对象的getValue方法获取Ognl表达式的值
本文没有对完整的漏洞细节进行分析,大家可以根据这篇文章,在关键方法的位置设置debug,然后逐步分析,还原漏洞的形成过程。
账号申请

- 洞态IAST合作伙伴计划之整体开源联合开发,申请方式请扫描下方二维码

- 如需加入技术讨论群,扫描二维码添加微信并备注"洞态IAST-加群",工作人员将拉您进群

本文迁移自知识星球“火线Zone”