简介
目标单位网络架构太过简单,要参加地市HW,奈何网络架构确实比较简单,对于蓝队来讲就网络环境只有防火墙,根本无法有效的阻止红队的攻击以及资产探测,所以结合开源的工具简单做一点儿工作。
网络架构(大概)
网络架构基本上就这样,只有防火墙。

HoneyPot
版本:HFish 3.3.1
操作系统
命令
mkdir hfish
wget https://hfish.cn-bj.ufileos.com/hfish-3.3.1-linux-amd64.tgz
tar -zxvf hfish-3.3.1-linux-amd64.tgz
firewall-cmd --add-port=4433/tcp --permanent   (用于web界面启动)
firewall-cmd --add-port=4434/tcp --permanent   (用于节点与管理端通信)
firewall-cmd --reload

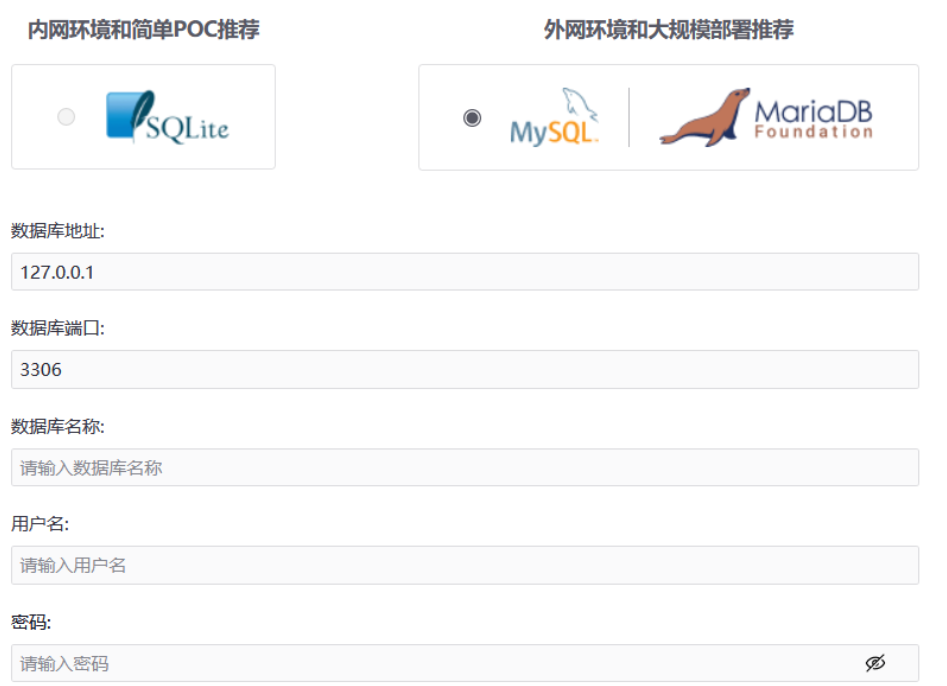
根据部署位置选择数据库,这里不建议一键搭建也不建议使用sqlite,本地搭建mysql不会有数据库限制以及数据清理方便
centos 安装mysql
配置v2ray
mkdir v2ray
cd v2ray/
wget https://github.com/v2fly/v2ray-core/releases/download/v5.4.1/v2ray-linux-64.zip
unzip v2ray-linux-64.zip
更换配置文件config.json

右键导出“所选服务器为客户端配置”,保存配置文件命名为"config.json",将该json文件放入v2ray文件夹目录下
mv ../config.json ./config.json
覆盖掉原来的json文件
配置全局代理
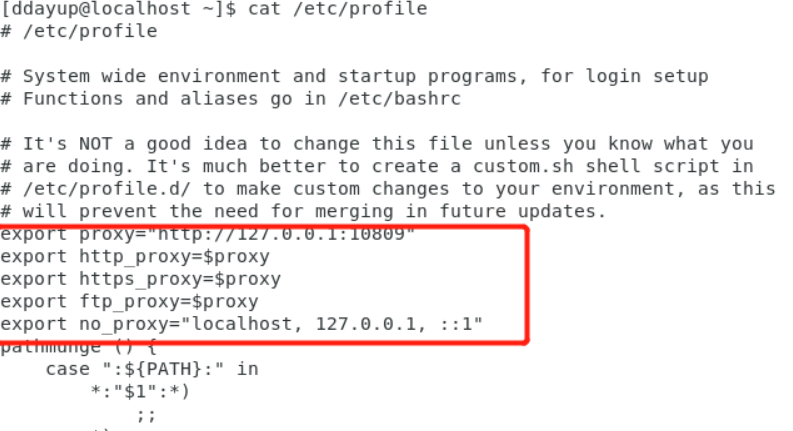
vim /etc/profile
在第一行添加内容
export proxy="http://127.0.0.1:10809"
export http_proxy=$proxy
export https_proxy=$proxy
export ftp_proxy=$proxy
export no_proxy="localhost, 127.0.0.1, ::1"
因为http的代理端口为默认的10809,socks端口为10808,这里看导出的配置文件即可
source /etc/profile   //保存配置文件
./v2ray run   //启动v2ray
wget www.google.com    //测试全局代理是否配置成功

安装mysql
[root@localhost centos]# rpm -qa | grep mysql    //检查是否安装过mysql
[root@localhost centos]# rpm -qa | grep mariadb //centos安装默认存在mariadb数据库,检查是否存在
mariadb-libs-5.5.68-1.el7.x86_64
[root@localhost centos]# rpm -e --nodeps mariadb-libs-5.5.68-1.el7.x86_64   //删除数据库

命令
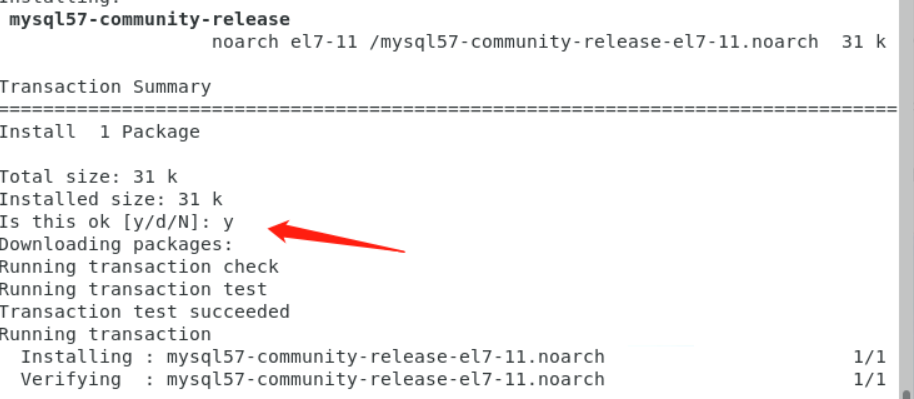
 curl -O https://repo.mysql.com//mysql57-community-release-el7-11.noarch.rpm

yum localinstall mysql57-community-release-el7-11.noarch.rpm
yum install mysql-community-server

提示无密钥重新安装密钥 rpm --import https://repo.mysql.com/RPM-GPG-KEY-mysql-2022

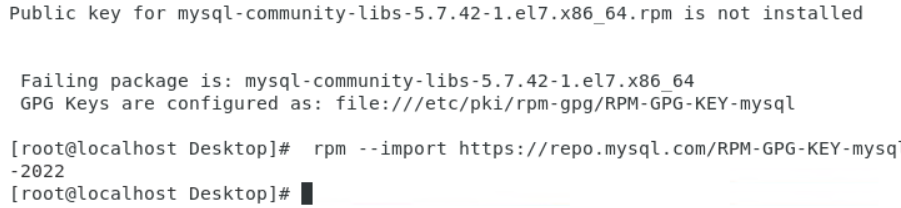
安装密钥后重新安装mysql服务端
yum install mysql-community-server
systemctl start mysqld  //启动mysqld
更新密码命令
mysql -uroot -p
set password for root@localhost = password('1qaz2wsx');
如果报错无法更改密码,修改配置文件
vim /etc/my.cnf
最后一行添加
skip-grant-tables
重启mysql
systemctl restart mysqld
登录后修改密码,如果报错需清楚缓存
flush privileges; //直译:更新权限
然后修改密码
HFish配置web内容

设置钓鱼页面,出口防火墙映射到互联网。不建议使用其本身自带的钓鱼页面,建议自写钓鱼页面,根据实际情况自写符合甲方的业务功能,保存js、css和index修改一下按照模板放入起起来就ok了

模拟网御的VPN映射在出口
拓展
- 在前端中添加恶意的js
- 前端添加下载链儿,添加免杀应用伪装docx
- 等等
安全性
前端仅存放表单,后端在内网,映射端口仅为html服务端口
优点
支持单节点以及蜜网
支持多种内置服务
支持拓展服务
如果说跟商业版的区别点是社交账号密码抓取,其实针对于本次HW来讲,在自制蜜罐的马子免杀做好,出口做nat映射之后上钩的效果可能真的不错。
小结
就防护来讲也谈不上无安全设备裸奔防守,搭建简单,配合上免杀马或许会有不错的收获。